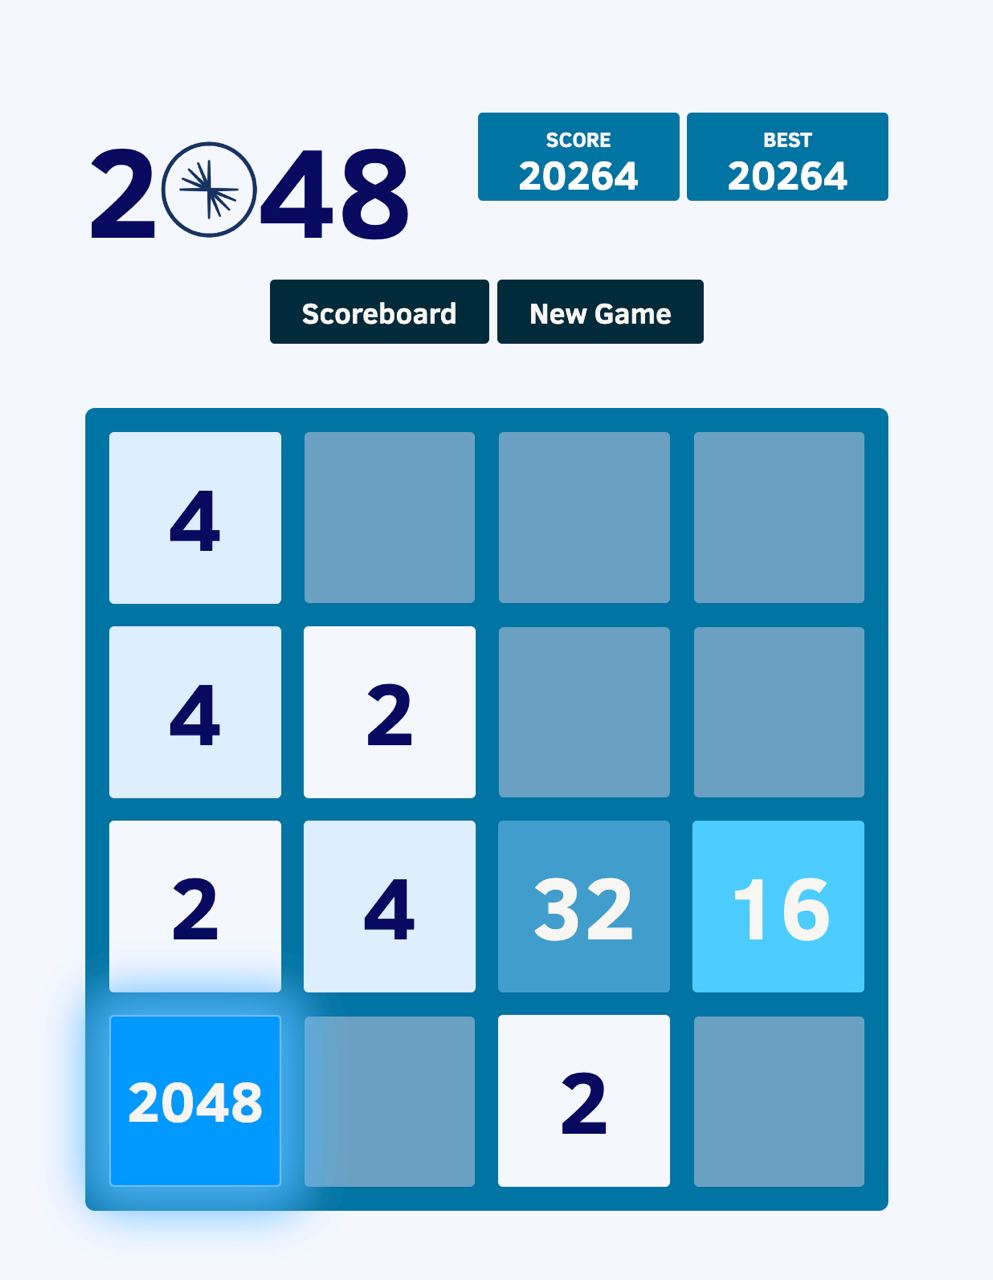
Streaming Games is a fun, simple application that ingests and stores event data from online games into Apache Kafka® topics. Once stored in Kafka topics, game data can be processed in flight using Apache Flink to create a scoreboard that updates in near-real time. In this self-paced workshop, you’ll learn how to apply the principles of streaming analytics to create your own scoreboard around the game 2048.
The scoreboard will be a table containing aggregated metrics of players include their:
-
Highest score
-
Highest level achieved
-
Number of losses
The scoreboard will continuously update as queries process new events as they occur.
To keep things simple, you’ll be using Confluent Cloud. Powered by the cloud-native Kora engine, this fully managed Kafka service will make it easy for you to leverage both the Kafka cluster, Flink and ksqlDB powering your streaming scoreboard.
Requirements
-
Java, Maven, and Terraform - The UI layer of the application relies on two APIs that are implemented using Java. You will need to have Java 11+ installed to build the source-code. The build itself is implemented using Maven, and it is triggered automatically by Terraform. You will need to have Terraform 0.14+ installed locally using your cloud provider credentials so Terraform can create and manage the resources for you.
-
Confluent Cloud CLI - During the demo setup, a bash script will set up the whole Confluent Cloud environment for you. To do that it will need to have the Confluent Cloud CLI installed locally. You can find instructions about how to install it here. v3.0.0 or later is required, logged in with the
--saveargument which saves your Confluent Cloud user login credentials or refresh token (in the case of SSO) to the localnetrcfile. -
AWS and Confluent Cloud accounts - This workshop runs on AWS and uses Confluent Cloud to manage the Kafka cluster and ksqlBD. If you do not have a Confluent Cloud account, you can create it with instructions below.
Pre-Work (Steps 1-3)
|
Follow this part carefully before the workshop! |
Step 1. Install workshop dependencies
Run the following command to install workshop dependencies
brew install terraform \
mvn \
jq \
awscli \
confluent-cli
Step 2. Set up your Confluent Cloud account and CLI
Step 2a. Log in to Confluent Cloud or sign up for Confluent Cloud account. If you want you can create a Confluent Cloud account also from AWS Marketplace
Step 2b. Create a Cloud API Key
Once inside your Confluent Cloud UI:
* Open the Confluent Cloud Console, click the Granular Access tab, and then click Next.
* Click Create a New One to create a tab. Enter the new service account name (tf_runner), then click Next.
The Cloud API key and secret are then generated for the tf_runner service account.
-
Next, save your Cloud API key and secret in a secure location. (You will need this API key and secret to use the Confluent Terraform Provider.)
-
Assign the
OrganizationAdminrole to thetf_runnerservice account by following this documentation on role-based access control (RBAC) in Confluent Cloud.

Step 2c. Configure the Confluent CLI
Log in to the Confluent Cloud CLI and run the following command:
confluent login --saveThe --save flag will save your Confluent Cloud login credentials to the ~/.netrc file.
Step 3. Clone this repo
Using your Terminal, run the following command to clone the Streaming Scorecard github repo to your local machine:
git clone https://github.com/lyuen-confluent/streaming-games.git
cd streaming-games
Configure and deploy (Steps 4-5)
Step 4. Configure the deployment
The whole workshop creation is scripted. The script will leverage Terraform to spin up the other resources needed in AWS.
|
As mentioned previously, the application uses a Kafka cluster running in a fully managed Kafka service. Therefore, the first thing the application will provision is Confluent Cloud resources using the Confluent Cloud CLI. If you are interested in learning how you can create a cluster in Confluent Cloud via the Web UI, check out this documentation: Quick Start for Confluent Cloud. |
Complete the following steps and run the associate commands for each to configure the application for deployment:
-
Create the
demo.cfgfile using the example provided in the config foldercp config/demo.cfg.example config/demo.cfg -
Provide the required information on the
demo.cfgfilewe advise using the utility gimme-aws-creds if you use Okta to login in AWS. You can also use the granted CLI for AWS credentials.
Amend any of the config, AWS region, or Schema Registry region based on your preferences.
For region choose one of: eu-central-1 , us-east-1 , ap-southeast-2 (check the Stream Governance - Essential package documentation as this requirement could change). More regions are available in the Advanced package.
export TF_VAR_aws_profile="<AWS_PROFILE>" export TF_VAR_aws_region="eu-west-2" export TF_VAR_schema_registry_region="eu-central-1" export TF_VAR_confluent_cloud_api_key=="<CONFLUENT_CLOUD_API_KEY>" export TF_VAR_confluent_cloud_api_secret="<CONFLUENT_CLOUD_API_SECRET>" -
If you are not using gimme-aws-creds, create a credential file as described in this Terraform documentation. The file in
~/.aws/credentialsshould look like the following example:[default] aws_access_key_id=AKIAIOSFODNN7EXAMPLE aws_secret_access_key=wJalrXUtnFEMI/K7MDENG/bPxRfiCYEXAMPLEKEYYou can set
TF_VAR_aws_profile="default"in thedemo.cfgfile
Take note of the optional configuration in the same file.
-
Change the value of
TF_VAR_games_listso that contains only the game 2048. -
Also make sure the
run_as_workshopis set totrue################################################### ########### Optional Configs ############ ################################################### export TF_VAR_games_list='["2048"]' export run_as_workshop="true"
Step 5. Deploying the application
|
Please note that during deployment, the script takes care of creating the required Kafka topics. There is no need to manually create them. |
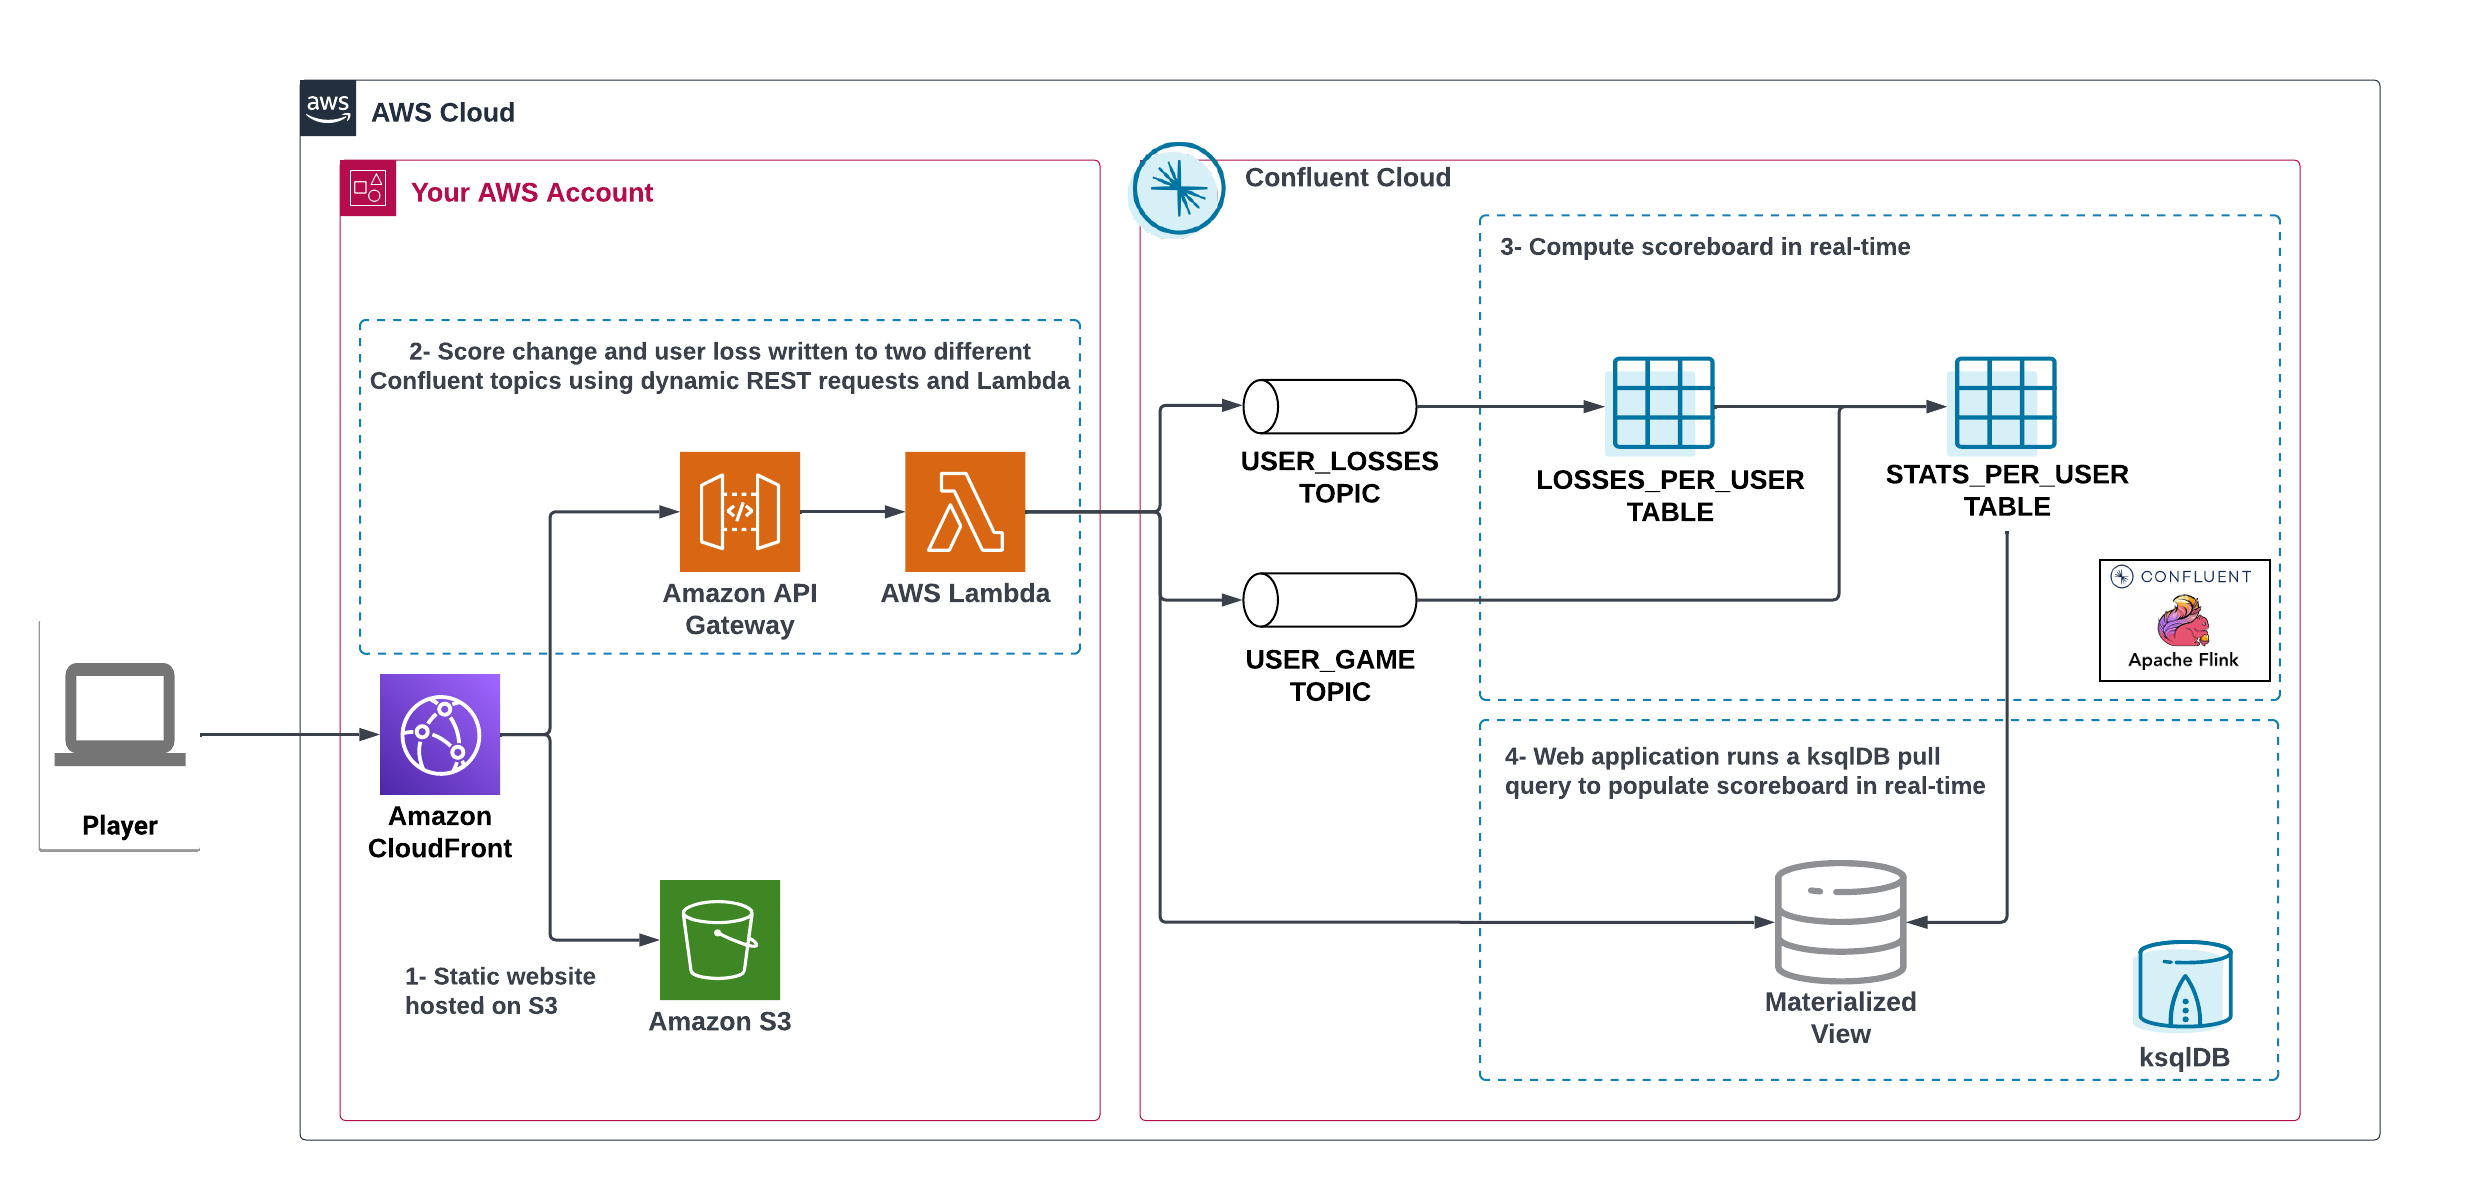
The application is essentially a set of HTML/CSS/JS files that forms a microsite that can be hosted statically anywhere.
But for the sake of coolness, we will deploy this microsite in a S3 bucket from AWS.
This bucket will be created in the same region selected for the Confluent Cloud cluster to ensure that the application will be co-located.
The application will emit events that will be processed by an event handler implemented as an API Gateway using a Lambda function on the backend. This event handler API receives the events and writes them into topics using native Kafka API.
-
Start the demo creation
./start.shAt the end of the provisioning the Output with the demo endpoint will be shown:
-
Paste the demo url in your browser and start playing!
Outputs: Game = https://d************.cloudfront.net/ -
Wait for the content to be available
|
It could take a bit of time for the content to be available via CloudFront. If accessing the link returned by the script you see an error message like the one below, don’t worry—just give it some more minutes and try the link again. Make sure you are not hitting refresh, as CloudFront might have sent you to a different url. It can take up to one hour for the CloudFront distribution to be available. 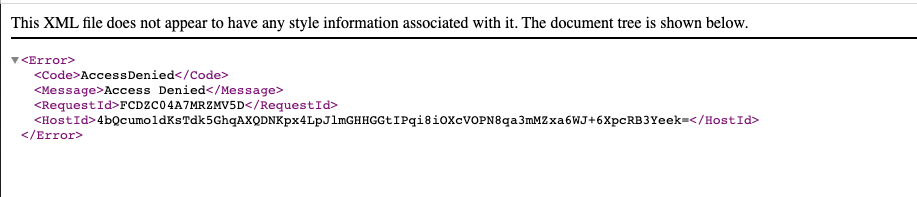
You can try to speed up this process using the trick explained in this medium article: Is your CloudFront distribution stuck “in progress”? |
Set up your scoreboard (Steps 6-8)
Step 6. Visualize the scoreboard
The scoreboard can be visualized in real time by clicking on the SCOREBOARD link in the top right corner of the 2048 game.
|
You will not be able to use this feature until you create the Flink queries and ksqlDB source table that populate the scoreboard. |
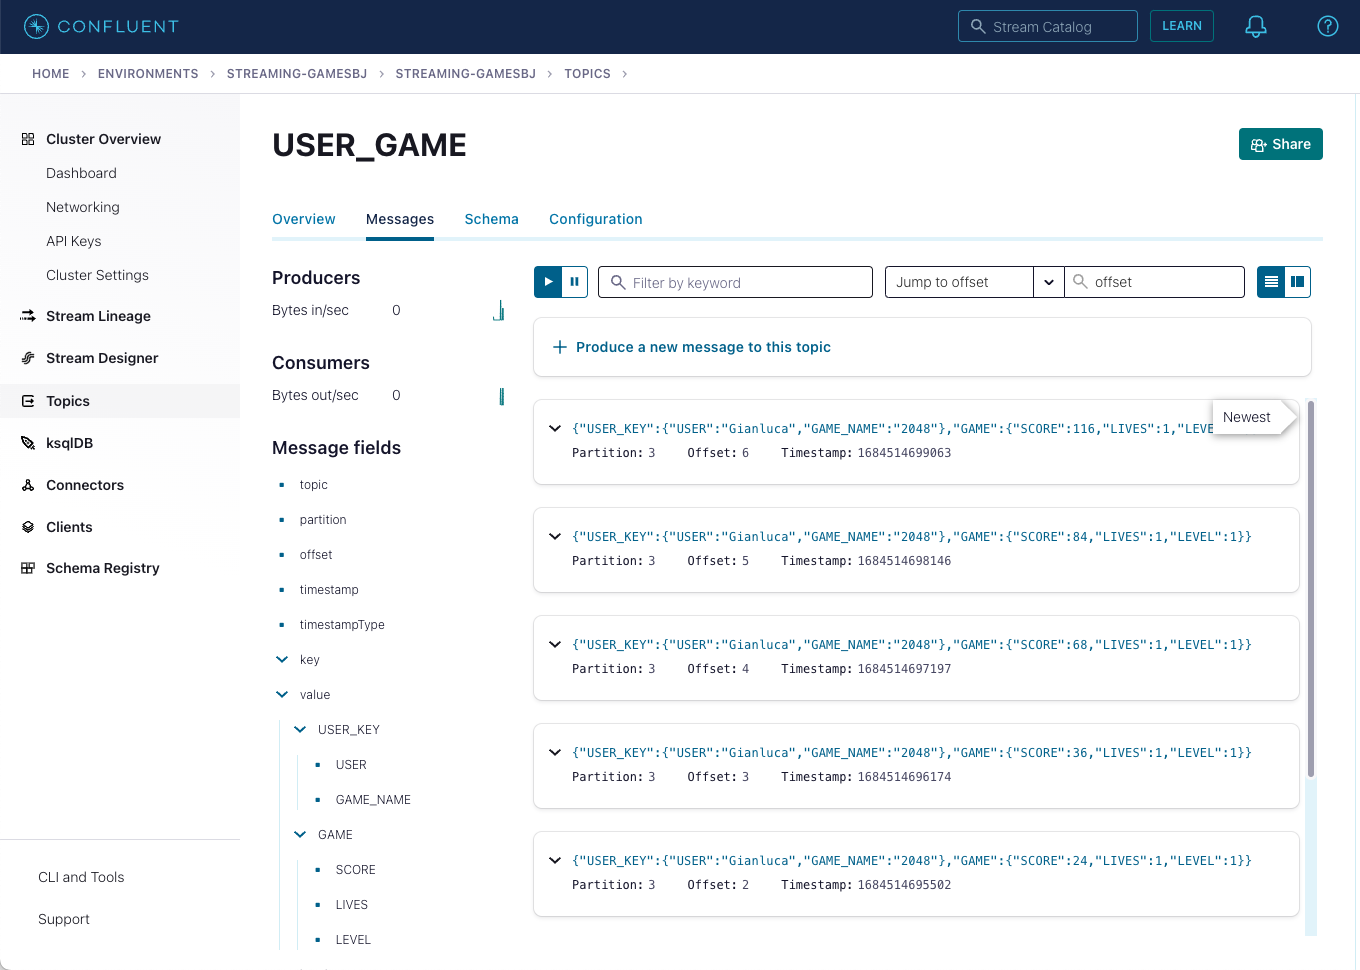
Before you run your first Flink queries, make sure the data is flowing into Confluent Cloud:
-
In Confluent UI, go to the environment and the cluster within it that were created by the Terraform script. (It should start with
streaming-games.) -
Next, click on Topics and choose
USER_GAMEtopic
As users engage with the 2048 game, two types of events will be generated.
The first is referred to as a "User Game" event which includes information about the user’s current game state, such as their score, level, and remaining lives. This event will be triggered every time the user’s score changes, the user advances to a new level, or the user loses a life.
The second type of event is called the "User Losses" event which, as the name suggests, captures data related to the user’s loss in the game. This event is triggered when the player reaches the game-over state.
A streaming analytics pipeline will be created using Flink to transform these raw events into a table with the scoreboard that is updated in near real-time.
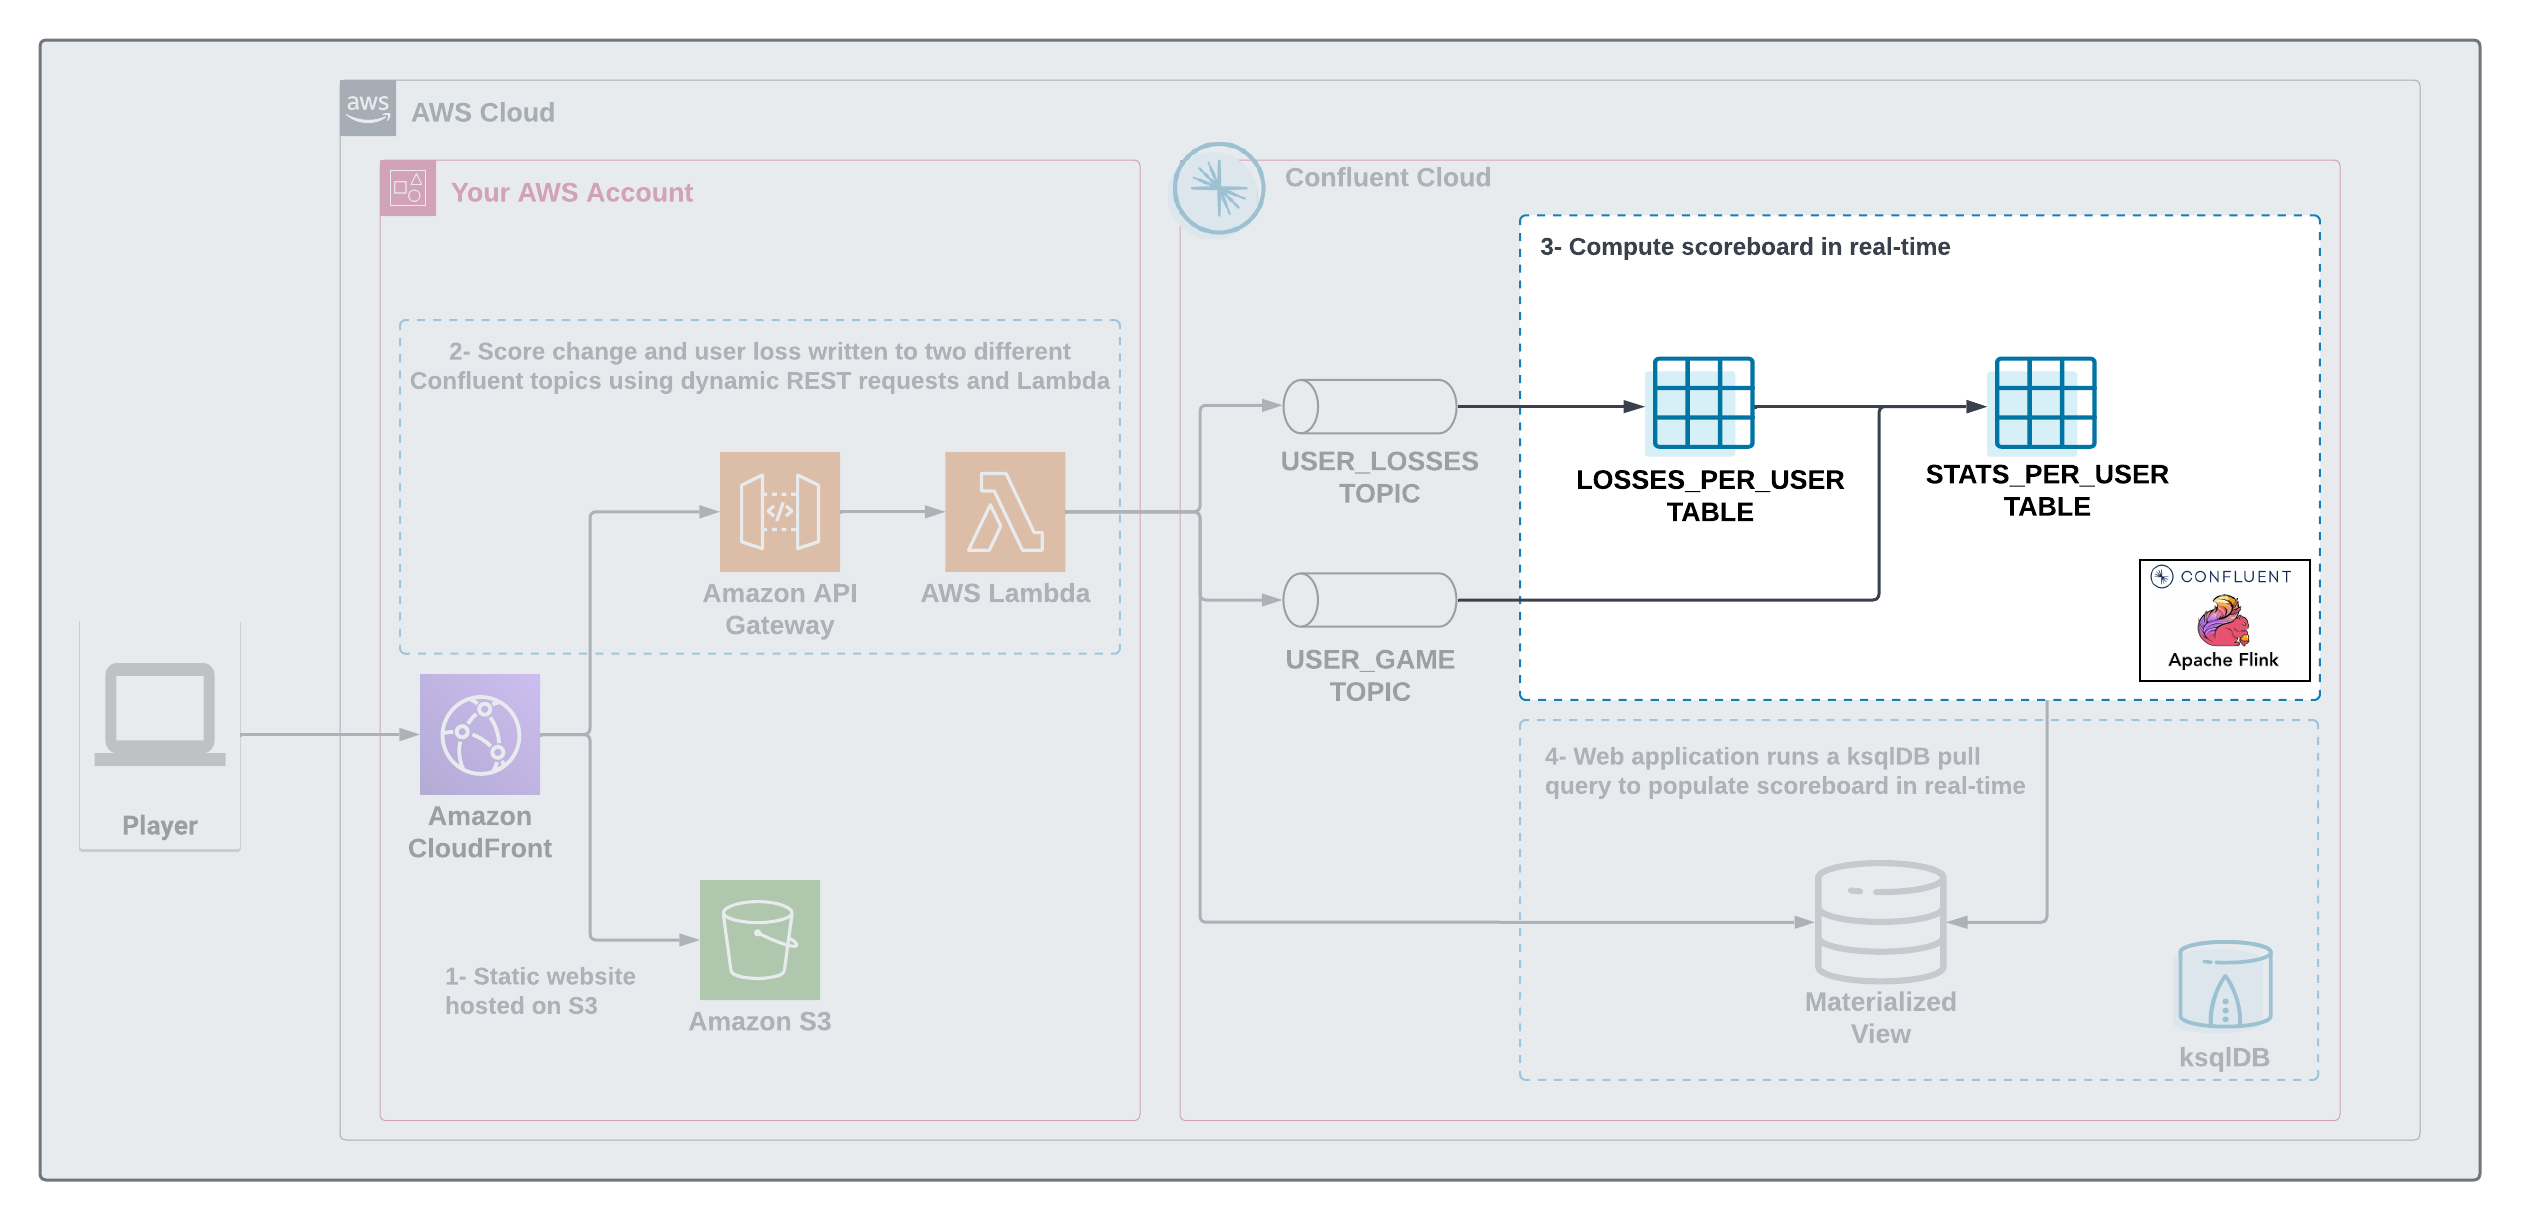
The STATS_PER_USER table created by Flink is backed by a Kafka topic, this is a changelog topic that contains all updates to the scoreboard.
We then use a feature called Source Table in ksqlDB to materialize this changelog topic into a state store that allows the lambda function to issue pull query to power the scoreboard.
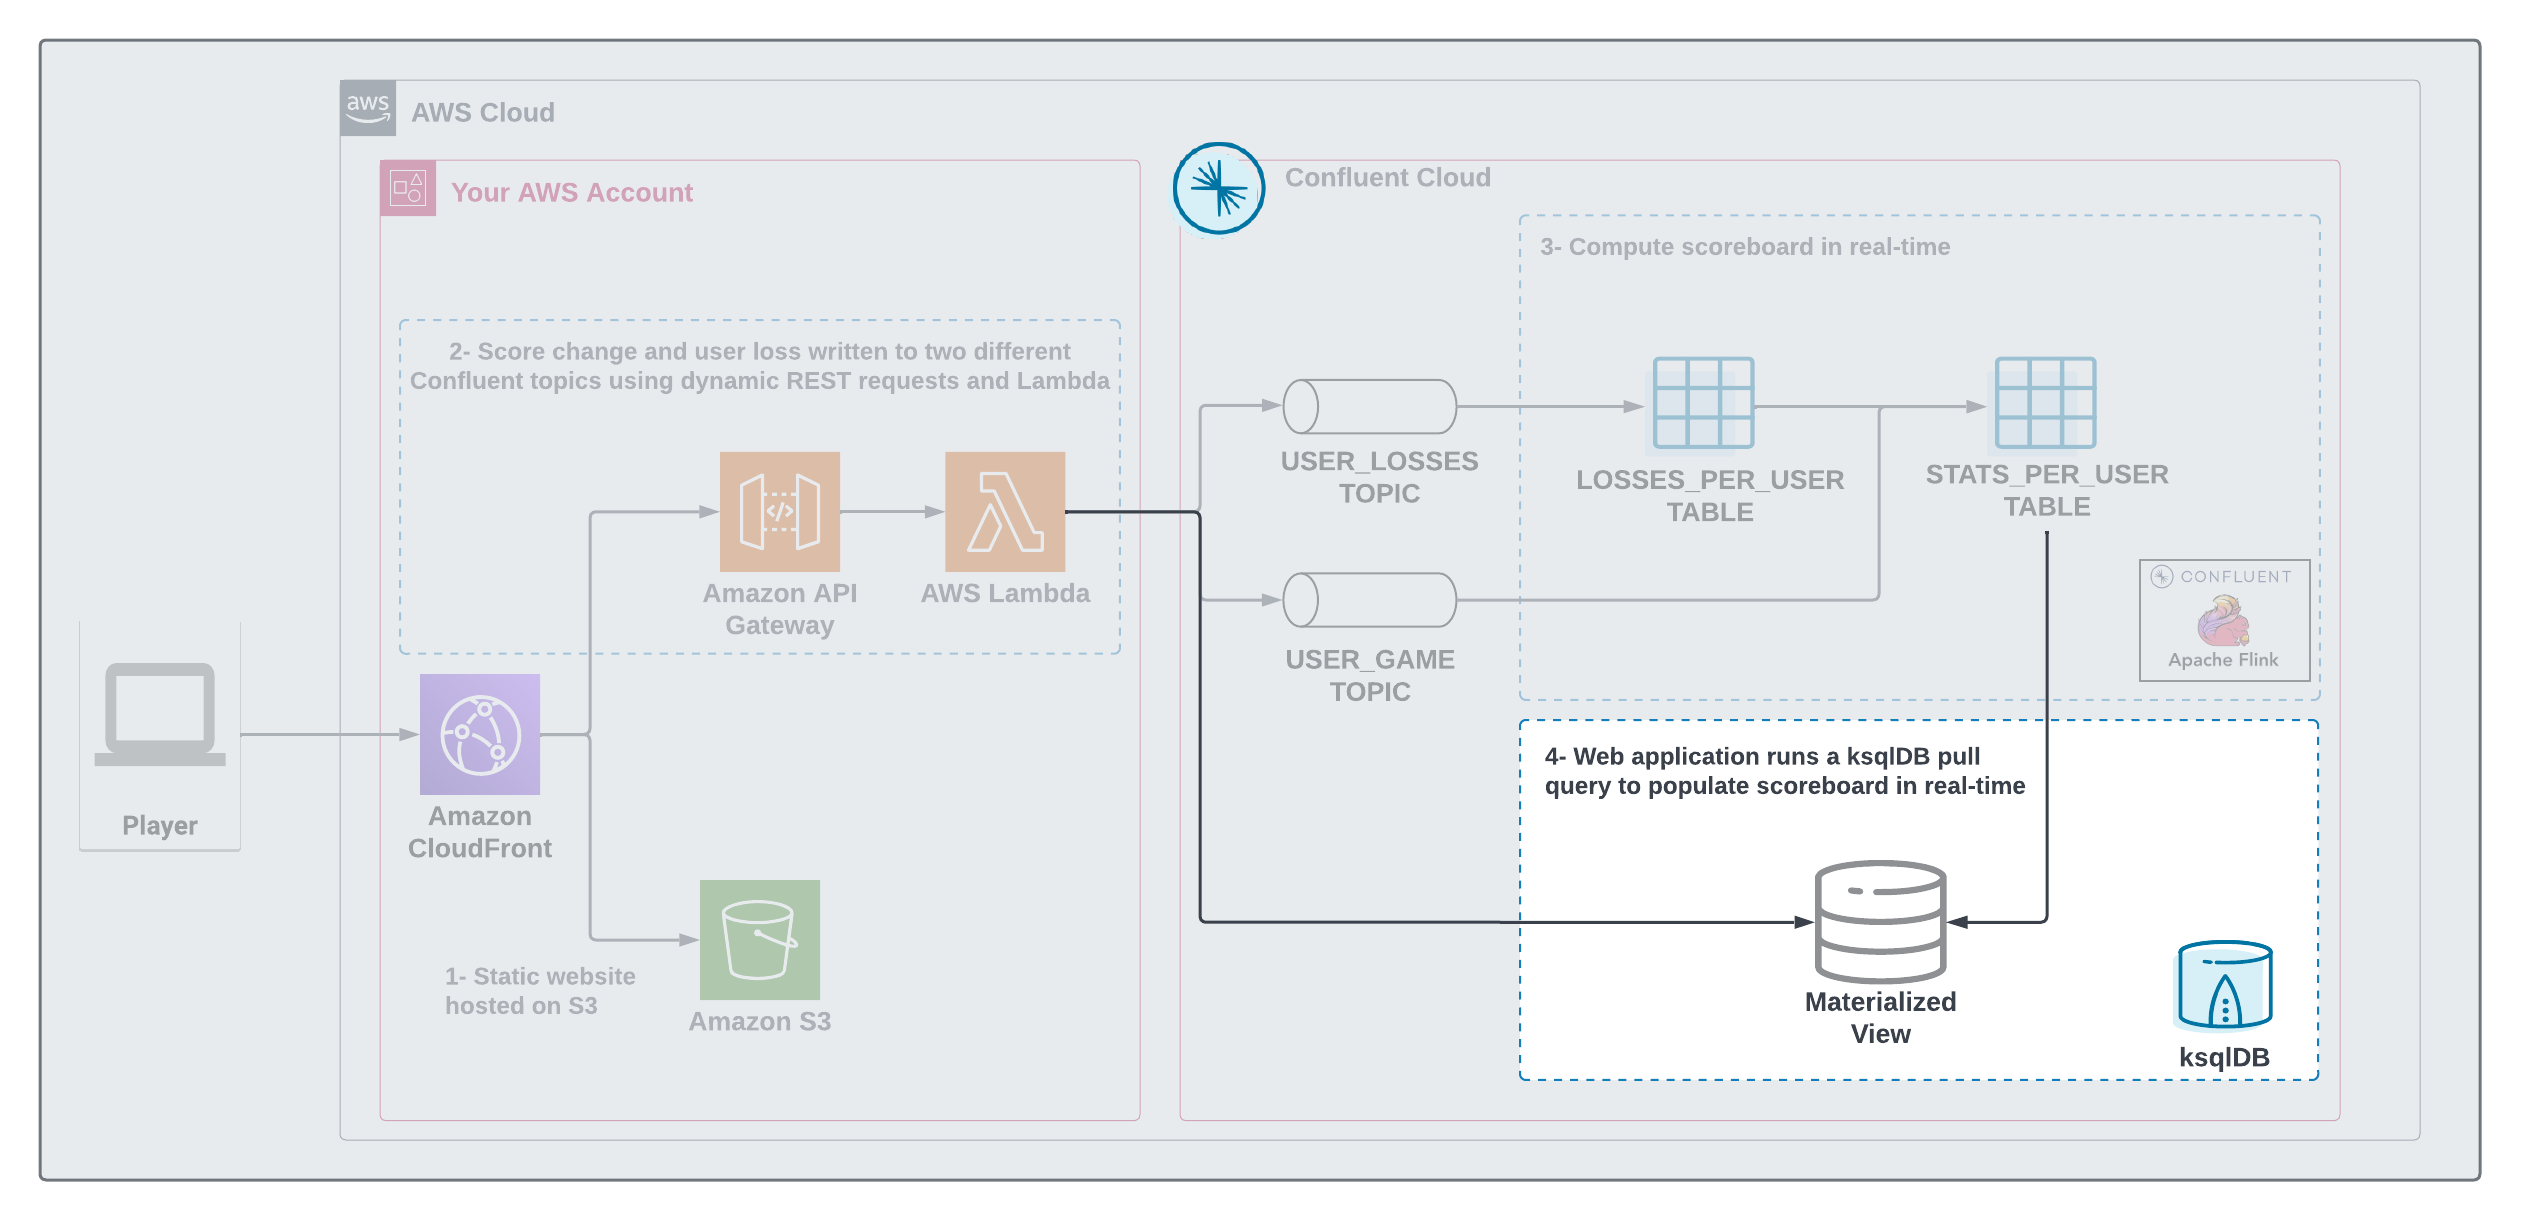
Now that you know how the data is flowing into Confluent and being processed by Flink and ksqlDB, you can create the Flink and ksqlDB queries that populate the scoreboard.
step 7. Create the Flink statements
To implement the streaming analytics pipeline, you’ll need to use Flink.
Open the SQL workspace for Flink by clicking the button "Open SQL worksapce" in your Flink compute pool.

Create the following statements in your SQL workspace.
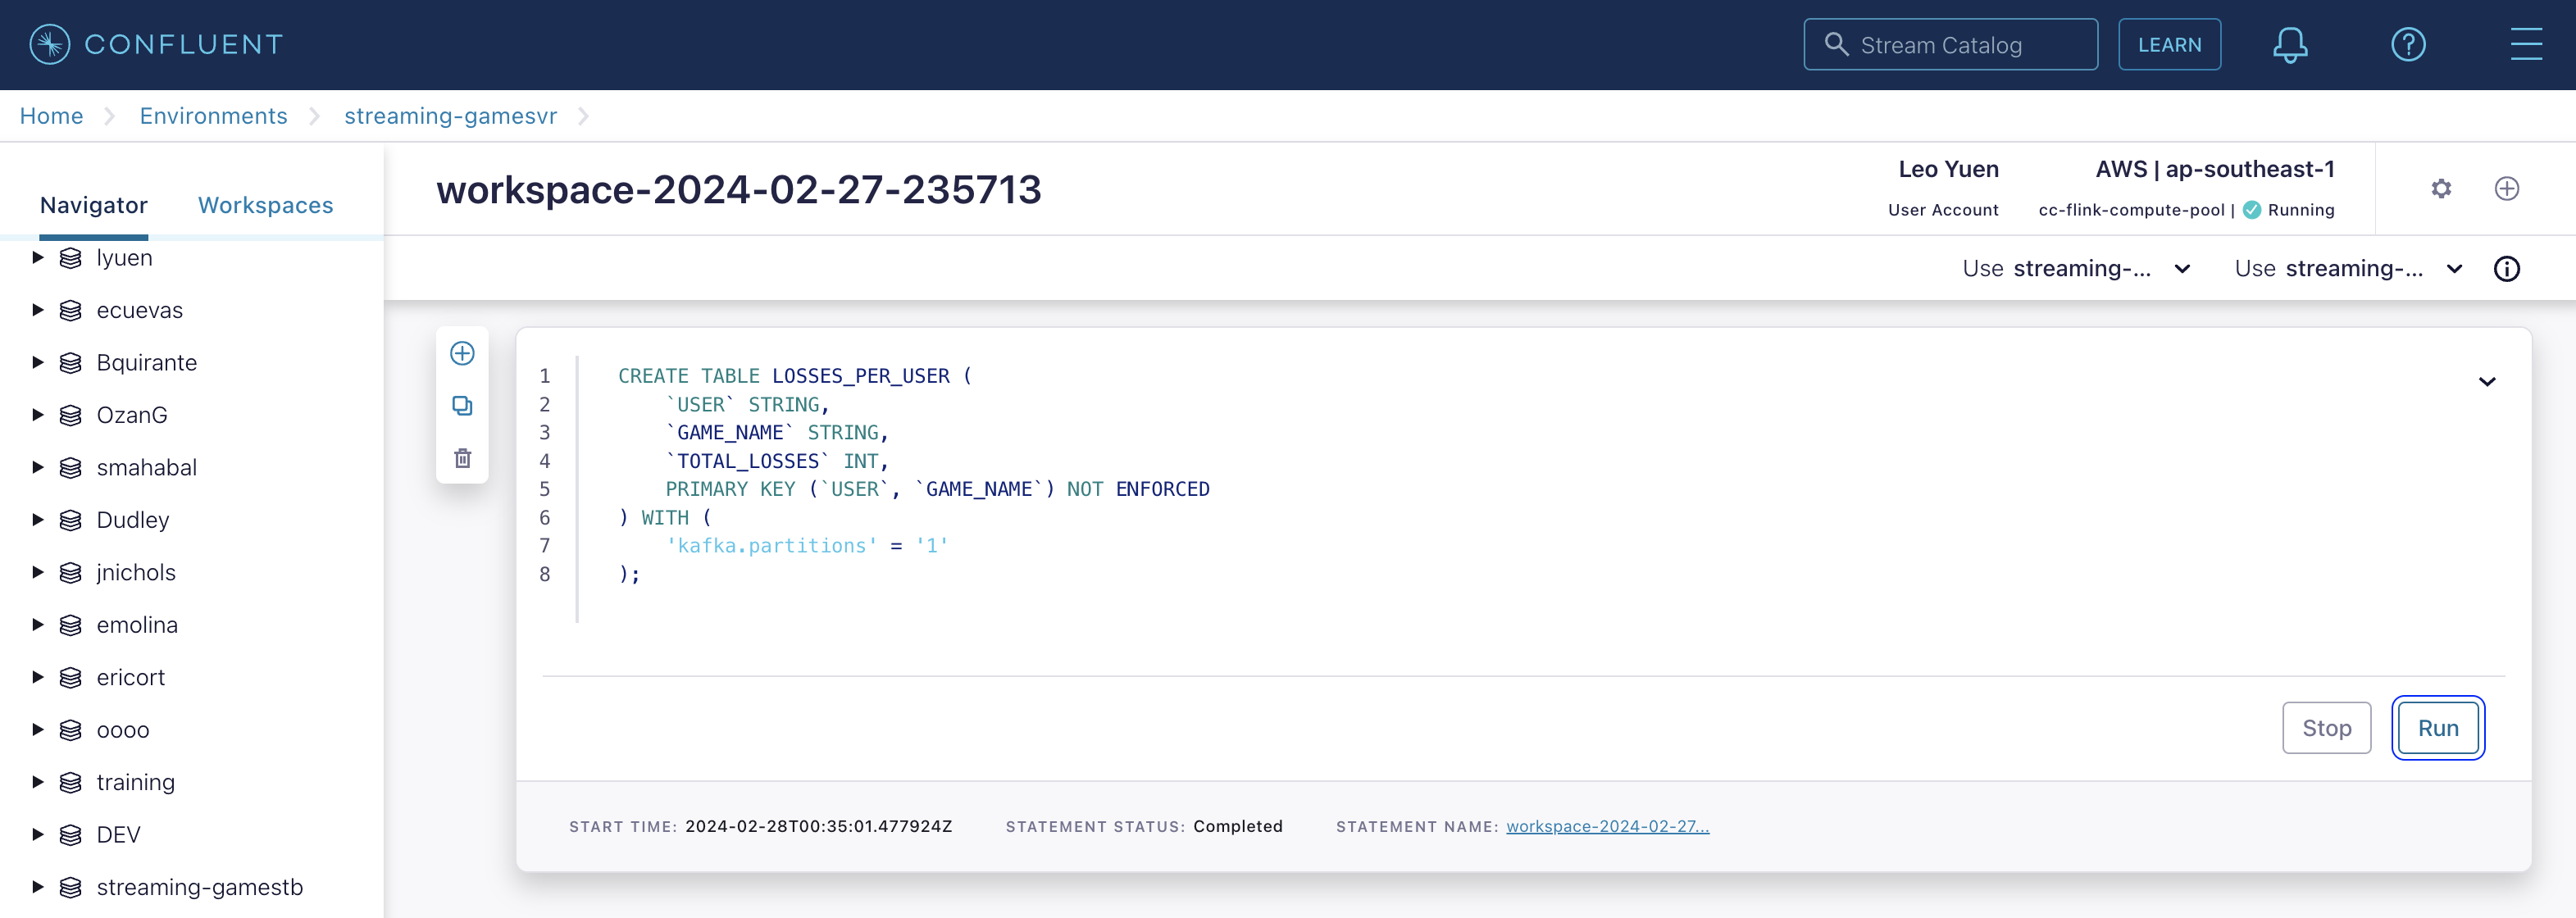
-
Create the LOSSES_PER_USER table to count the number of losses for each player.
CREATE TABLE LOSSES_PER_USER (
    `USER` STRING,
    `GAME_NAME` STRING,
    `TOTAL_LOSSES` INT,
    PRIMARY KEY (`USER`, `GAME_NAME`) NOT ENFORCED
) WITH (
    'kafka.partitions' = '1'
);
INSERT INTO LOSSES_PER_USER
SELECT
    `user`,
    game_name,
    cast(count(game_name) as int) as total_losses
FROM USER_LOSSES GROUP BY `user`,game_name;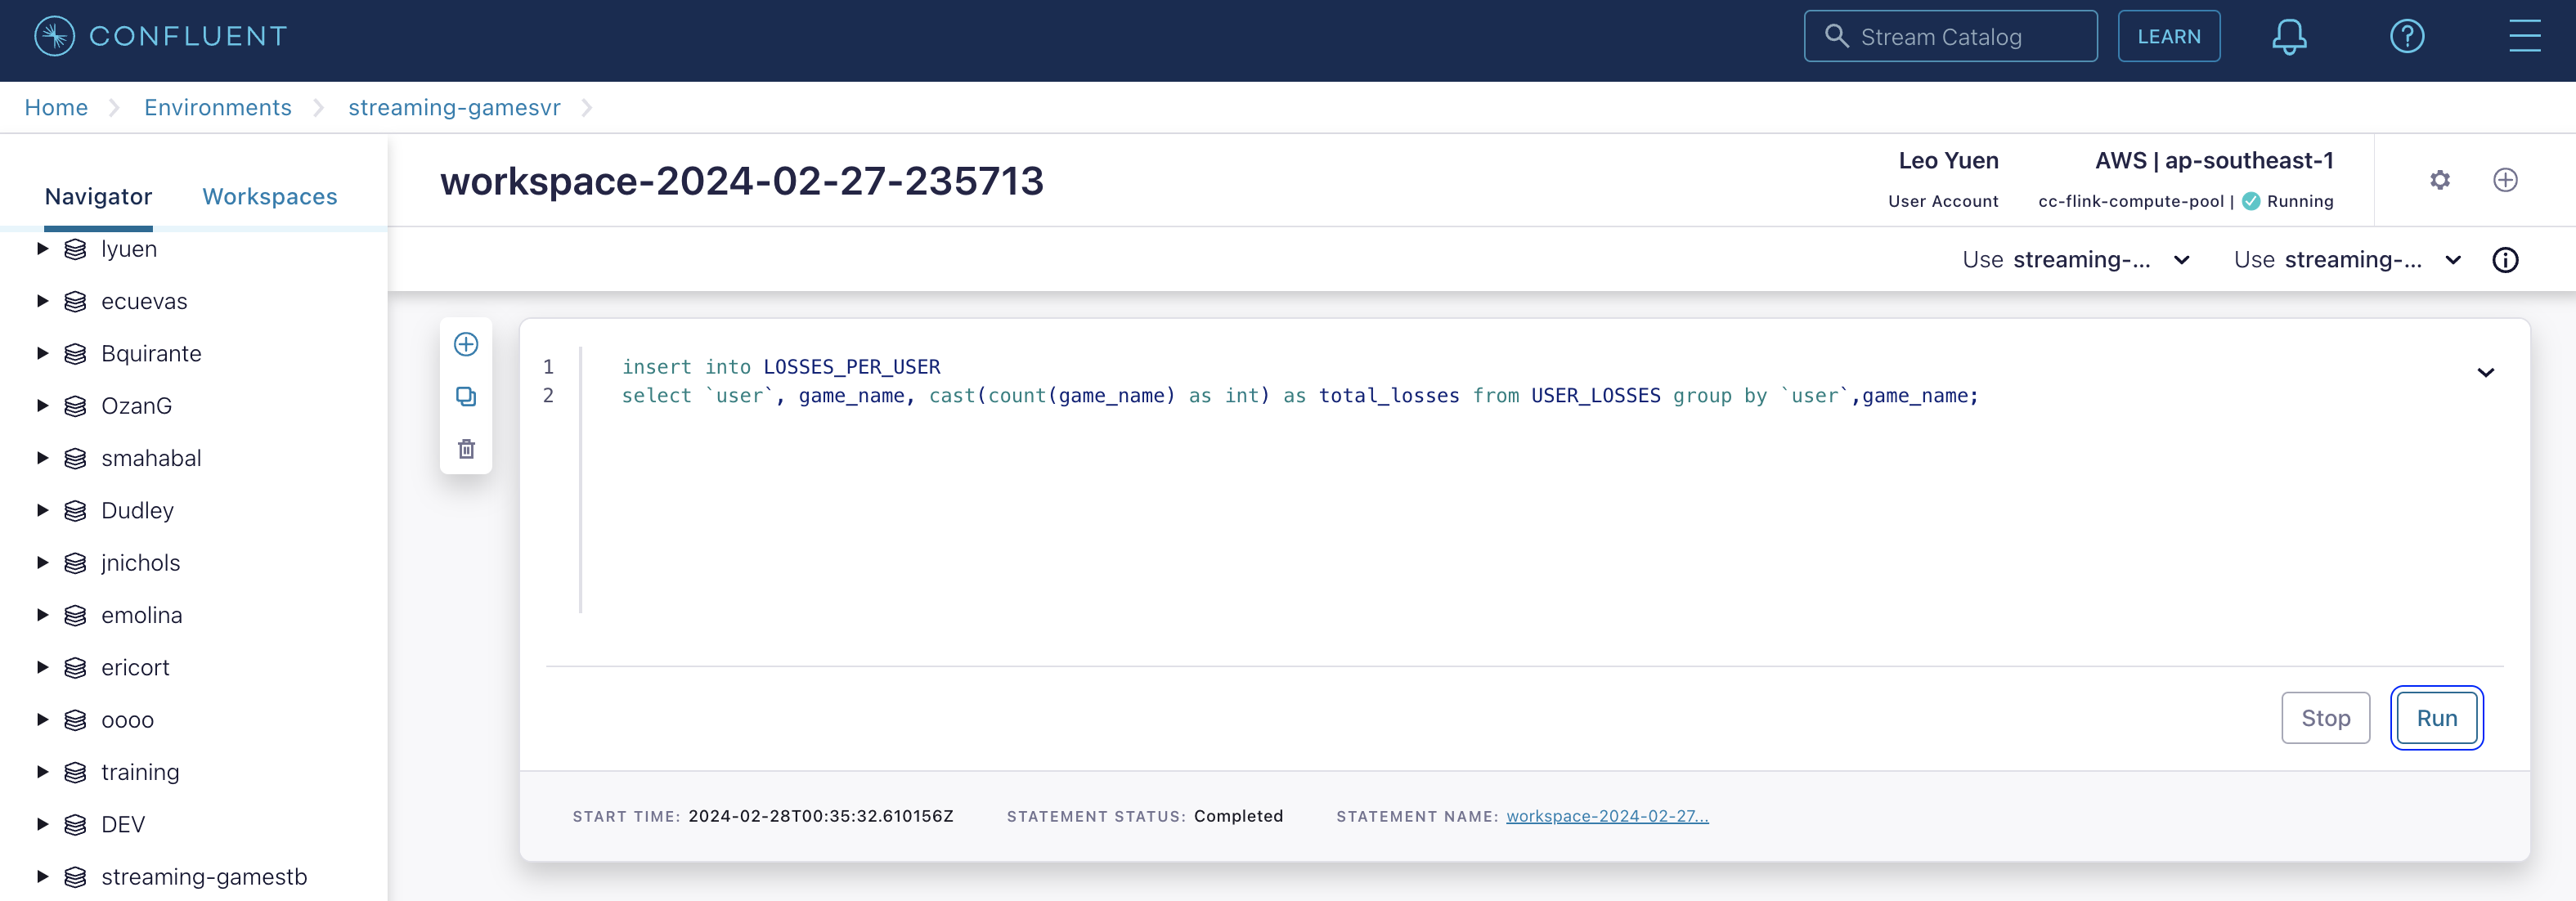
-
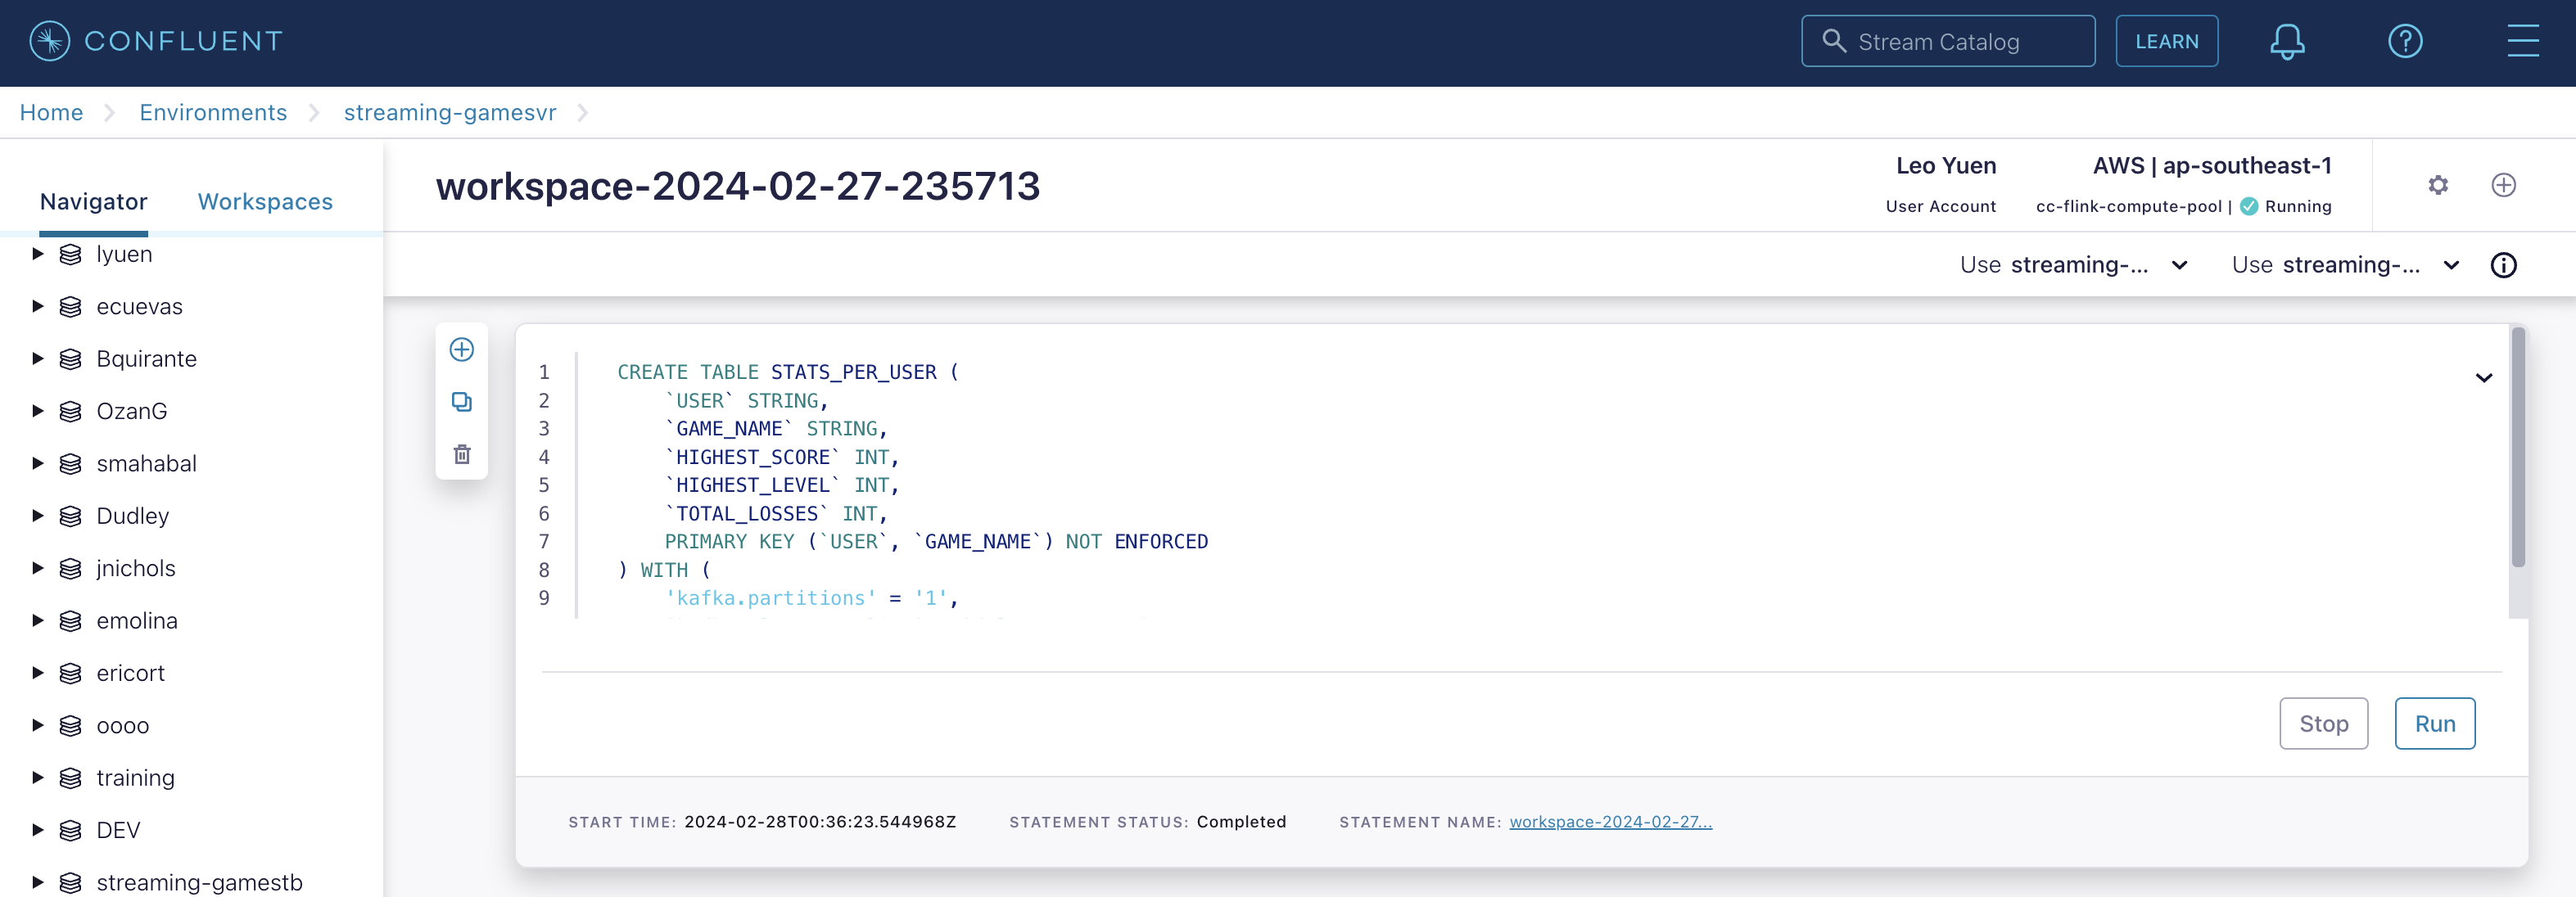
Create the STATS_PER_USER Table
CREATE TABLE STATS_PER_USER (
    `USER` STRING,
    `GAME_NAME` STRING,
    `HIGHEST_SCORE` INT,
    `HIGHEST_LEVEL` INT,
    `TOTAL_LOSSES` INT,
    PRIMARY KEY (`USER`, `GAME_NAME`) NOT ENFORCED
) WITH (
    'kafka.partitions' = '1',
    'kafka.cleanup-policy' = 'delete-compact'
);
INSERT INTO STATS_PER_USER
SELECT
    UG.`user` AS `USER`,
    UG.game_name AS GAME_NAME,
    MAX(UG.score) AS HIGHEST_SCORE,
    MAX(UG.level) AS HIGHEST_LEVEL,
    MAX (
        CASE
            WHEN LPU.TOTAL_LOSSES IS NULL THEN CAST (0 AS INT)
            ELSE LPU.TOTAL_LOSSES
        END
    ) AS TOTAL_LOSSES
FROM
    USER_GAME UG
    LEFT JOIN LOSSES_PER_USER LPU ON UG.`user` = LPU.`USER` AND UG.game_name = LPU.GAME_NAME
GROUP BY
    UG.`user`, UG.game_name;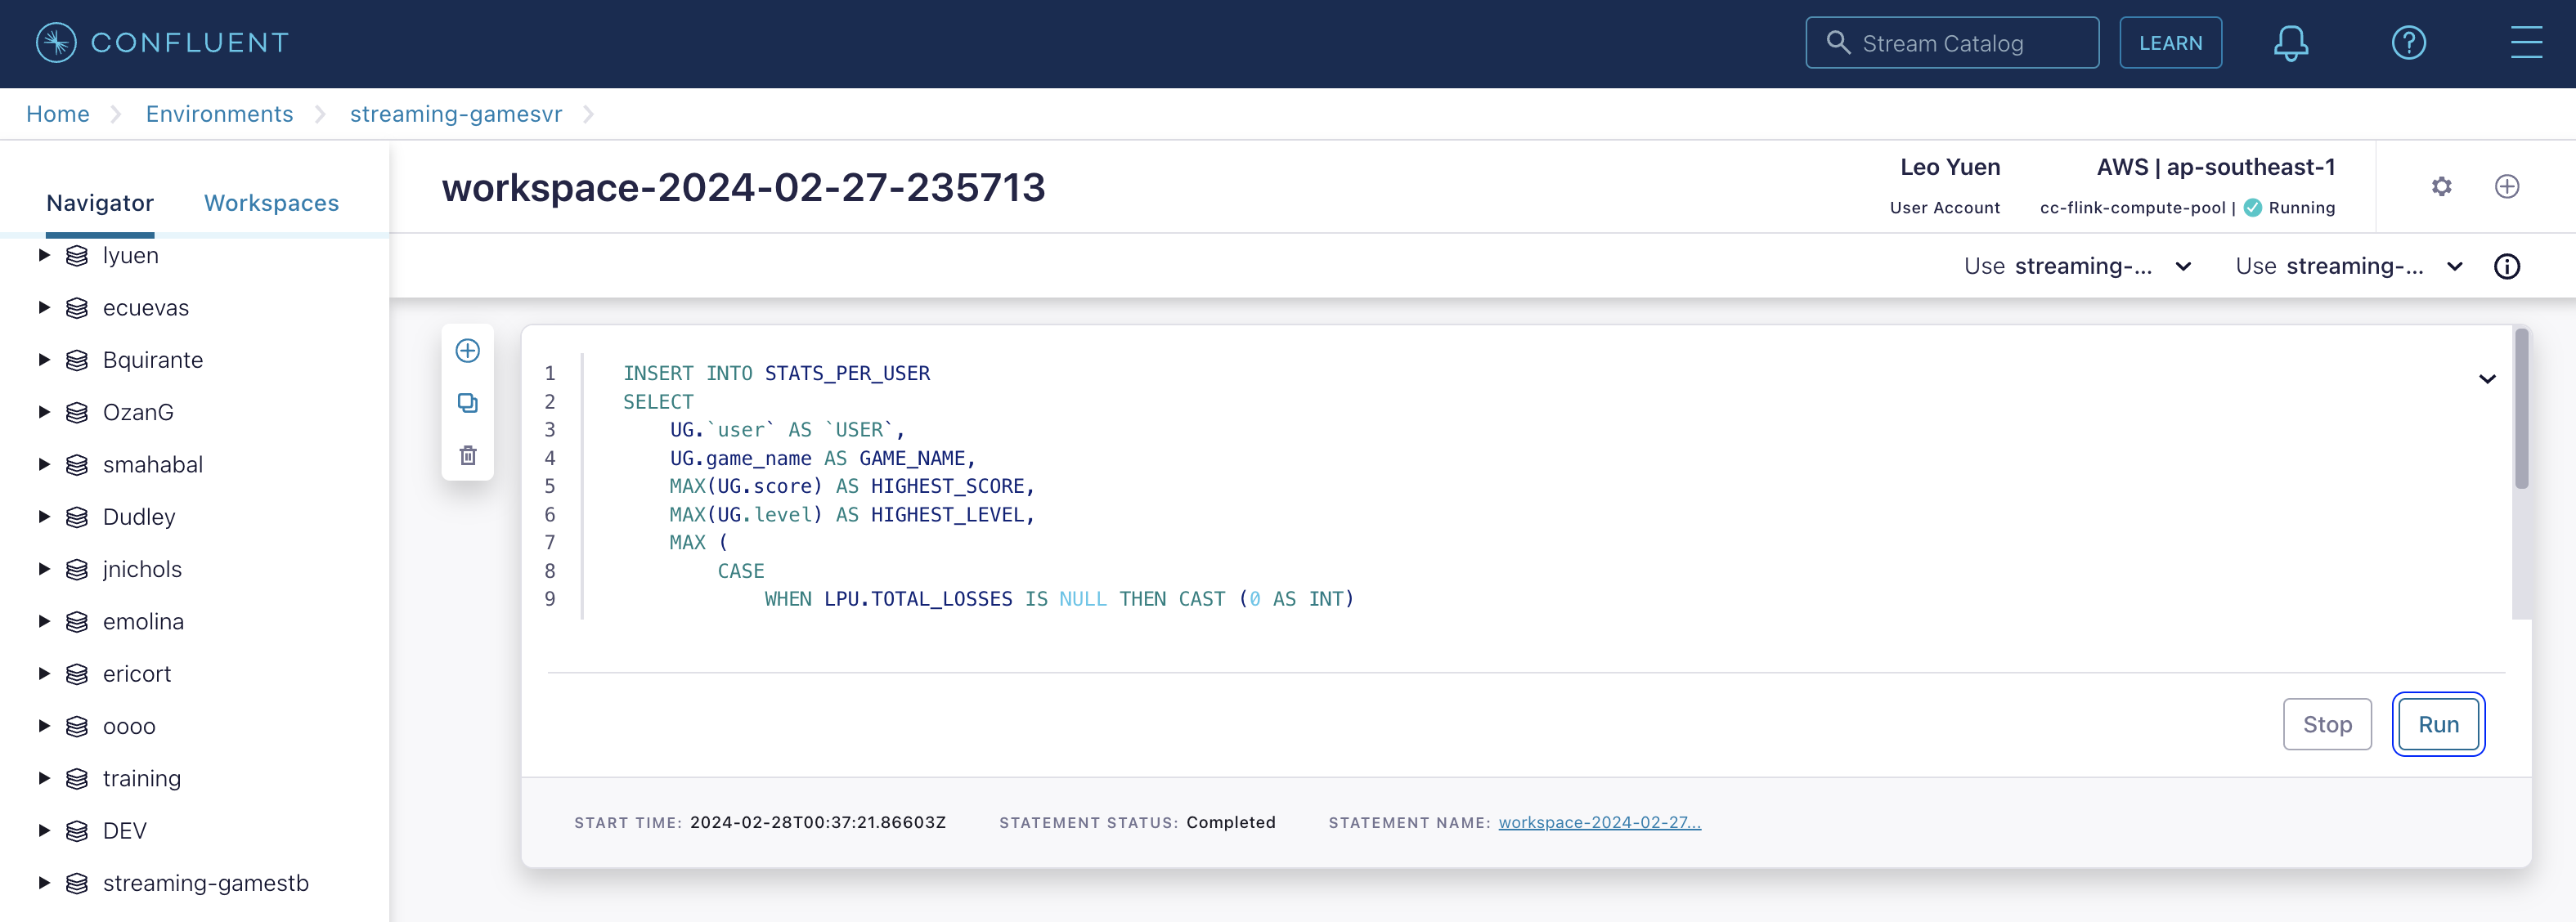
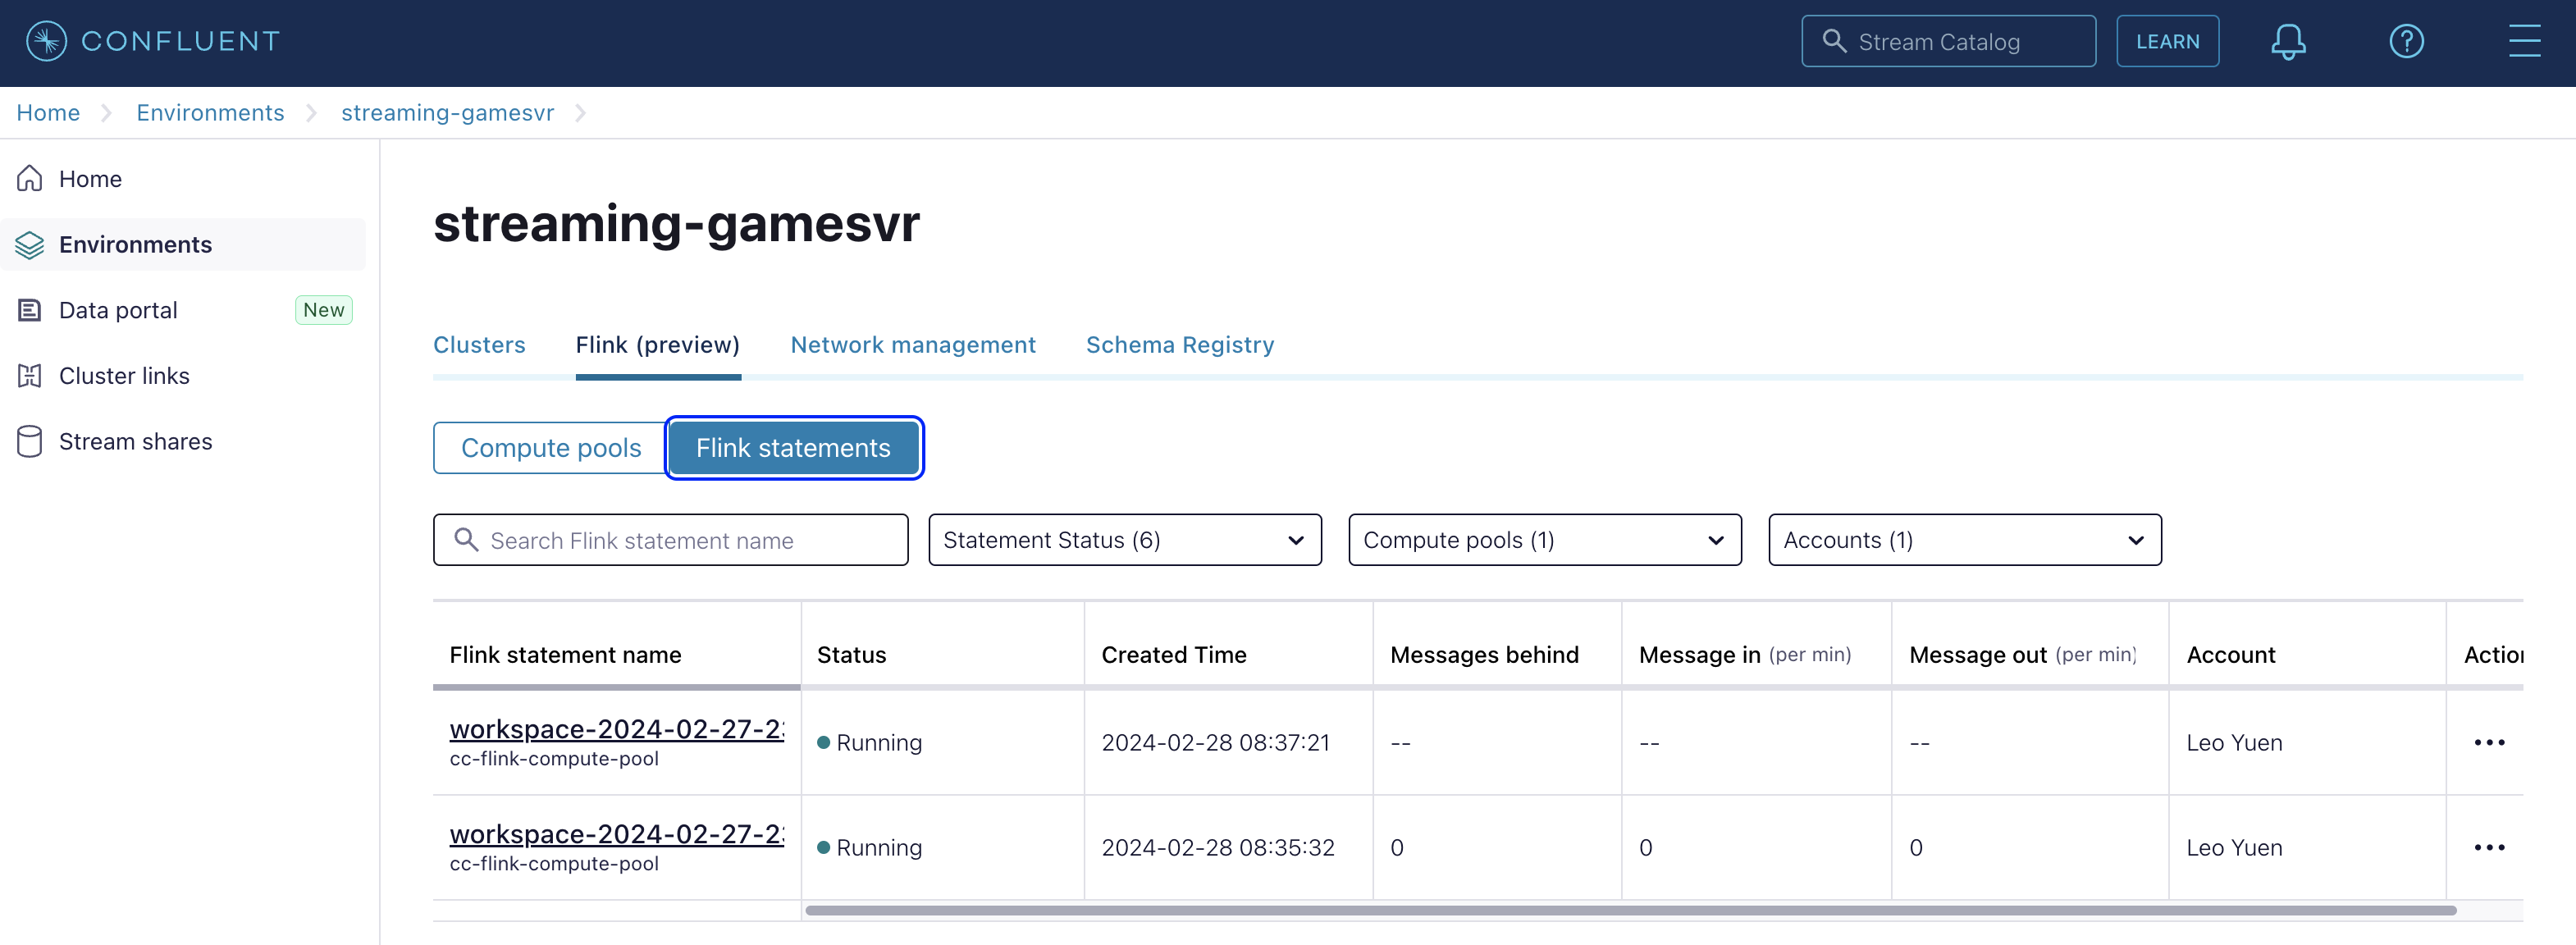
Now if you click "Flink statements", you will find 2 Flink statements are currently running:
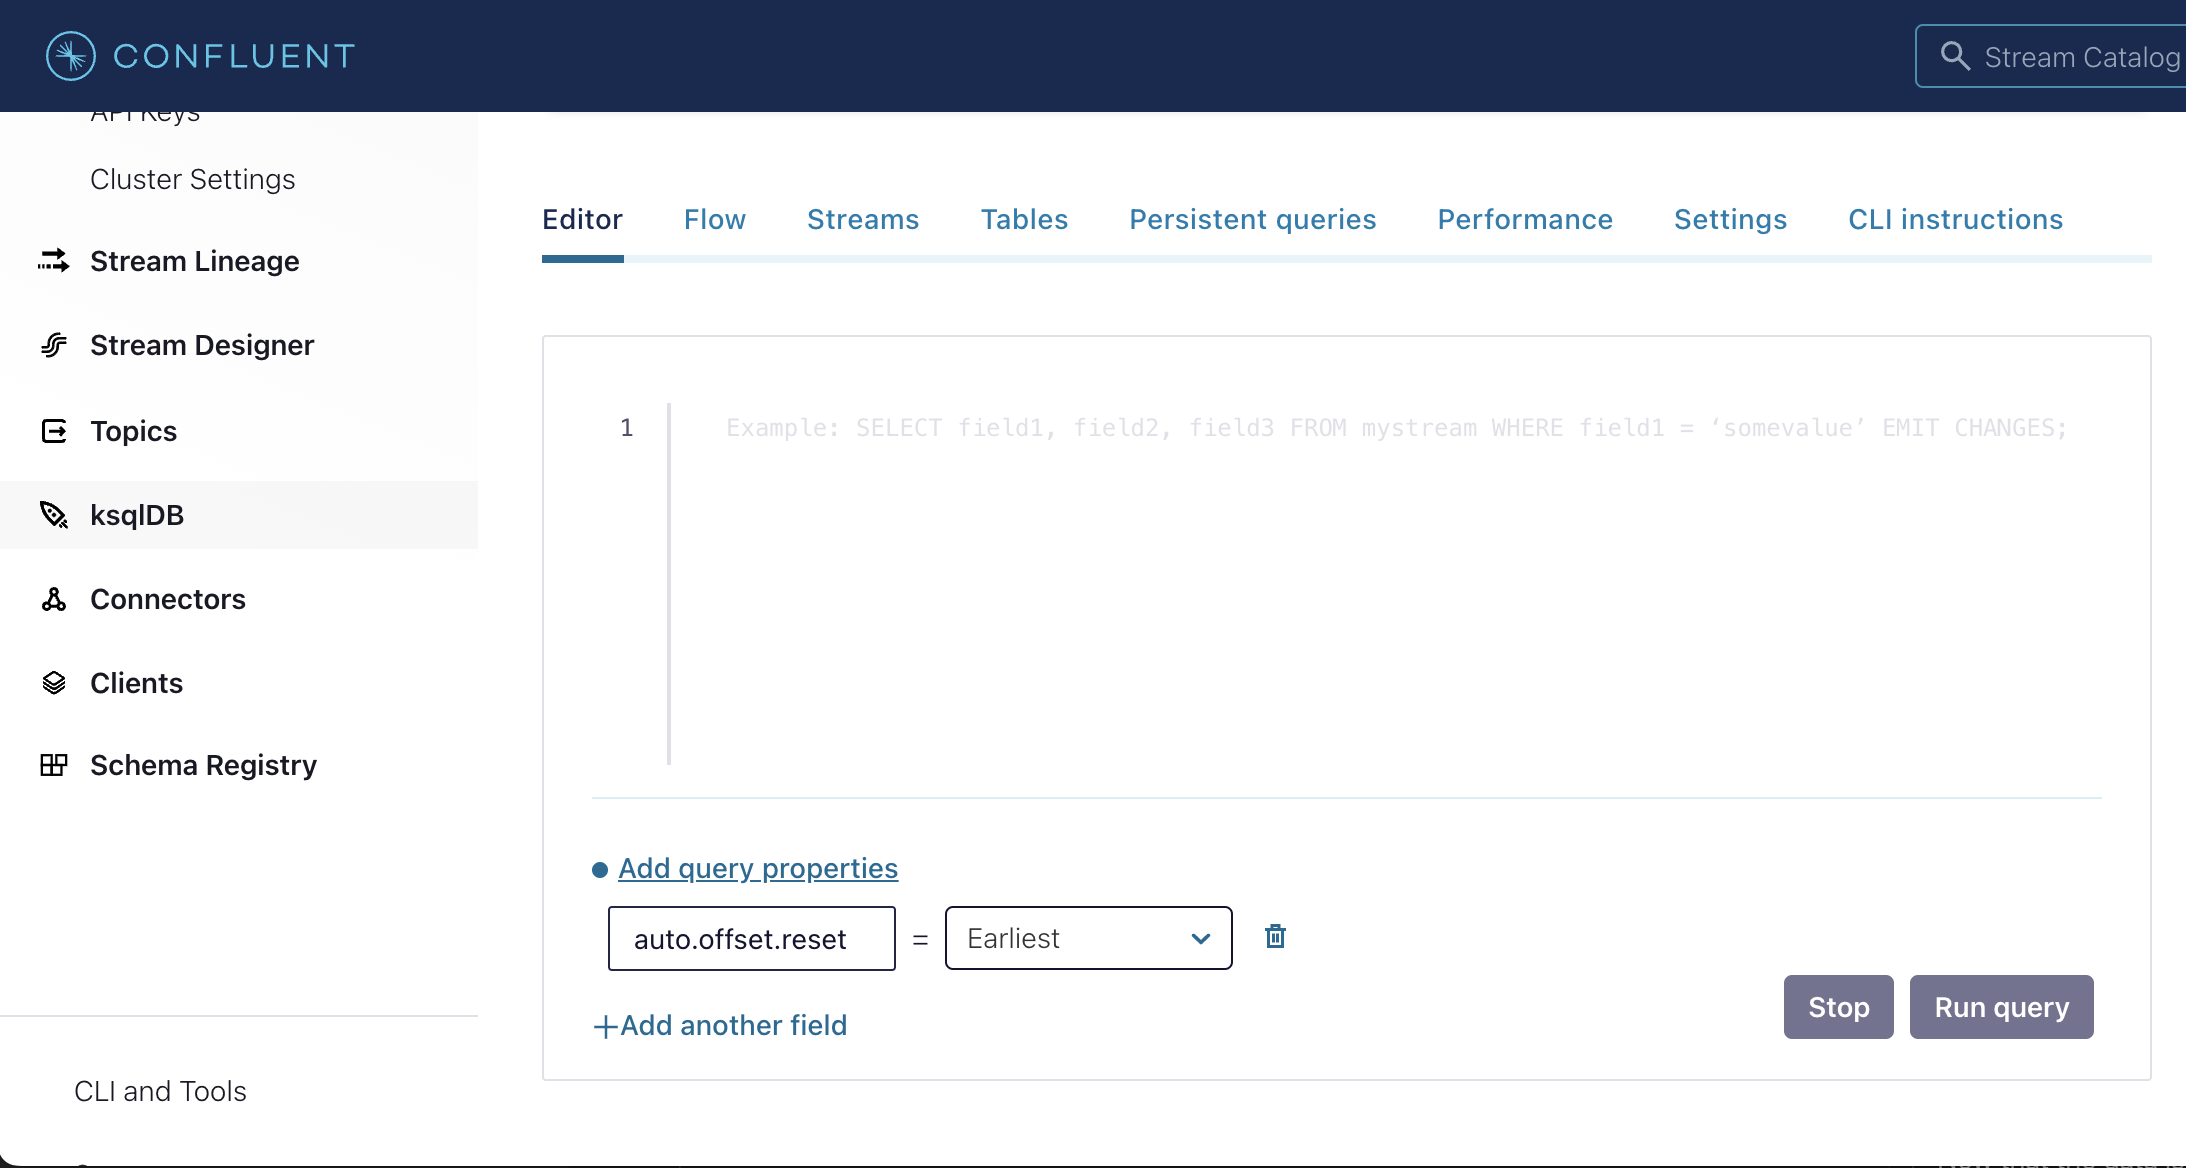
Step 8. Run the ksqlDB queries
To create a materialized view of the STATS_PER_USER table created by Flink, you’ll need to use ksqlDB.
Run the following queries in your ksqlDB instance in Confluent Cloud.
-
Set
auto.offset.resettoEarliest
-
Create the STATS_PER_USER Source Table
CREATE SOURCE TABLE STATS_PER_USER WITH ( KAFKA_TOPIC = 'STATS_PER_USER', FORMAT = 'AVRO');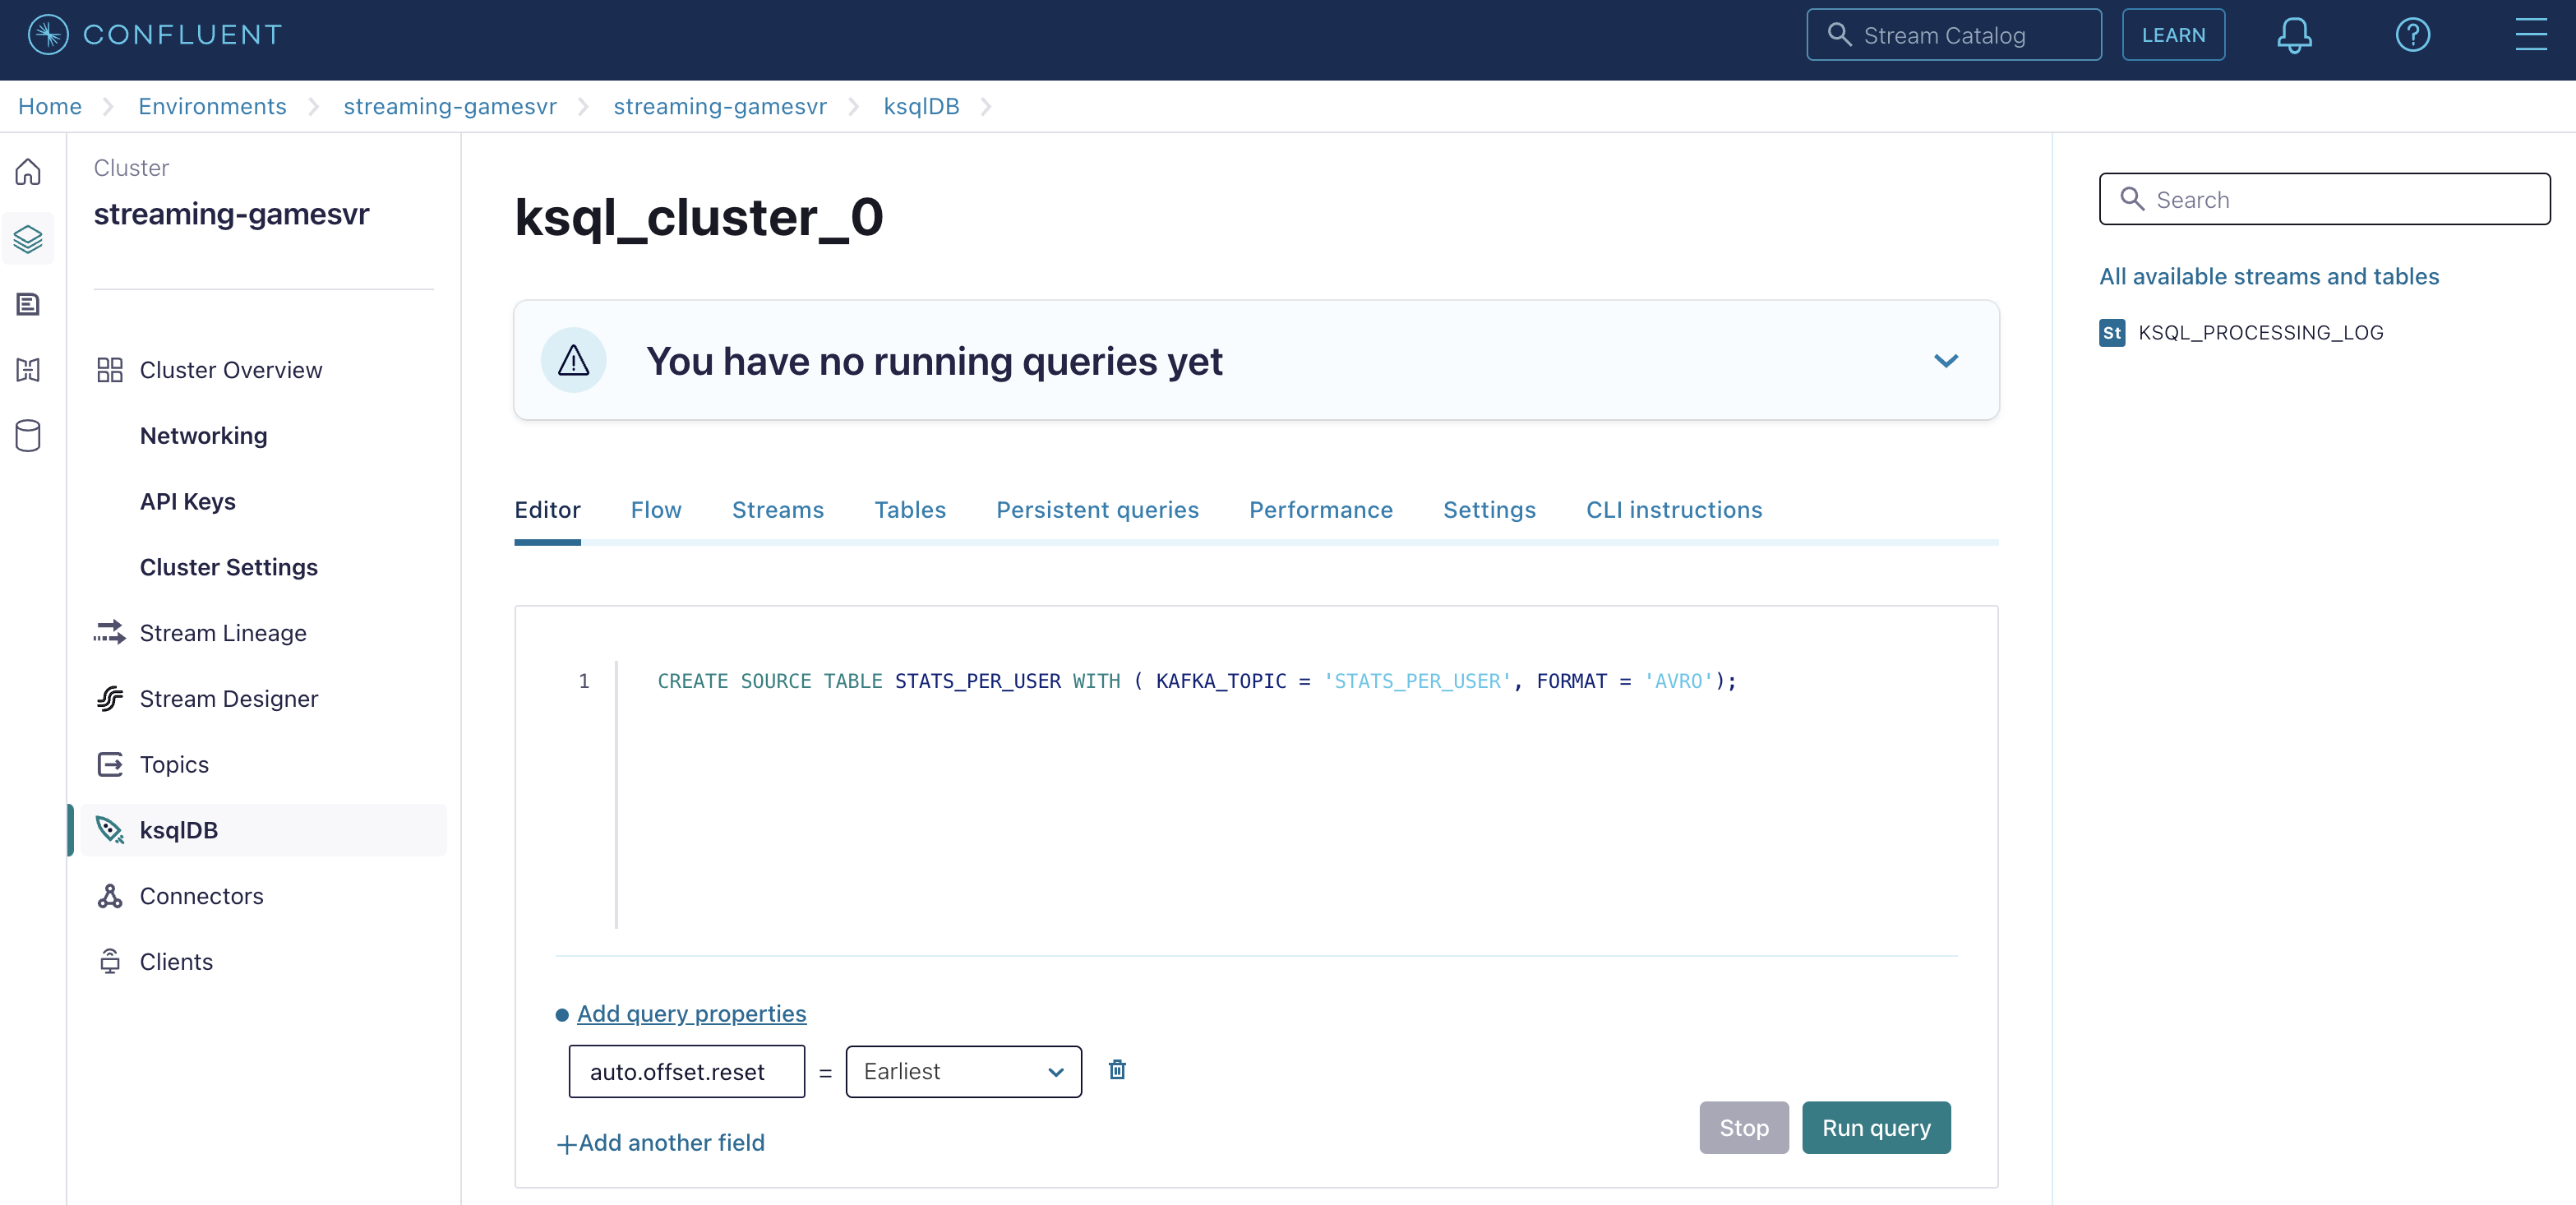
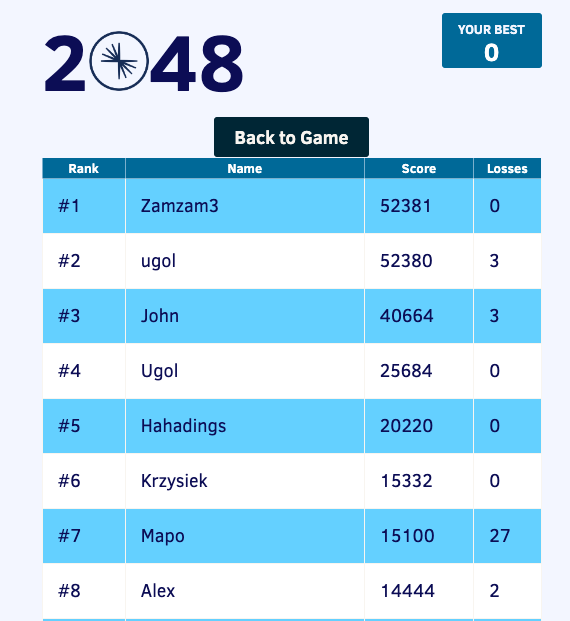
-
Now, check the scoreboard to see if it’s populated like the following example.
the Scoreboard logic
Here’s how the scoreboard logic works—ksqlDB supports pull queries, which allow you to get the latest value for a given key.
Pull queries are what allow the 2048 app to show you the scoreboard, updated in near-real time. Each query to the STATS_PER_USER table is sent to ksqlDB to get all the players scores for the selected game.
SELECT
  ROWKEY->USER,
  HIGHEST_SCORE,
  HIGHEST_LEVEL,
  TOTAL_LOSSES
FROM STATS_PER_USER
WHERE ROWKEY->GAME_NAME='2048';
Destroy your resources (Step 9)
(…and save money!)
|
The great thing about using cloud resources is that you can spin them up and down with just a few commands. If you are not planning to use the Streaming Scorecard application again, remember to destroy the resources you created once you are finished with this workshop to avoid incurring additional charges. |
Automatically destroy all the resources created using the following command:
./stop.shYou can always spin these resources back up any time you want. Simply uncomment the run_as_workshop variable in the config file to automate the creation of ksqlDB queries and you can demo the app again without any manual effort!